Deke
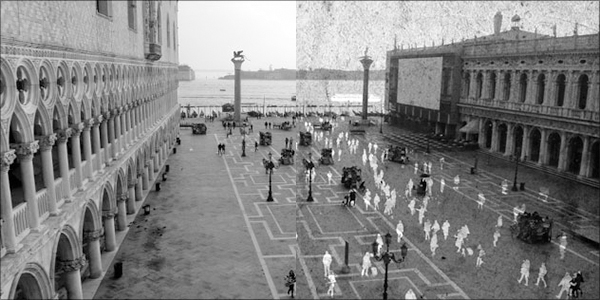
How To Remove Annoying Tourists From Your Photos
It’s actually a lot simpler than you think it is: The Eiffel Tower without tourists. Fantastique!
So if you want to eradicate people from your photos, there are going to be a couple of things that you need. First you need photos (makes sense, right?), preferably lots and lots of them – of the same angle over and over. And because you need photos of the same scene, you’ll either need a tripod or the iron grip of Superman to stabilize your shots.
Once that’s all set, you can head over to Snapmania and create a free account. Once you’ve uploaded your photos, all you have to do is apply the Tourist Remover filter. You need at least a couple of photos, and with fingers crossed, you can proclaim that Chinese officials gave you a private tour of the Great Wall.
Luckily, if it doesn’t work, there are other methods. The second option requires some Photoshop mojo, or more specifically, access to a copy of Photoshop. You’ll need the Extended version of Photoshop CS3+ or above so any old version just won’t work. (It should work for CS4, CS5 and CS6.)
Instructions are going to vary for different versions of Photoshop, but the basic gist is the same. Open all your different shots into the program, and once you’re there, run the Image Stack feature to remove people:
An image stack combines a group of images with a similar frame of reference, but differences of quality or content across the set. Once combined in a stack, you can process the multiple images to produce a composite view that eliminates unwanted content or noise.
In this case, “unwanted content or noise” would refer to the tourists in your photo. It’s possible to banish those drunk Americans from your Cabos pictures, if not from your memory.
The basic instructions are as follows, for the most recent versions of Photoshop (if you’ve got CS3, it might be time to upgrade. Adobe also has a more detailed guide if you run into problems):
- Combine the separate images into one multi-layered image. (An image stack must contain at least two layers.)
- Choose Select > All Layers.
- Choose Edit > Auto-Align Layers and select Auto as the alignment option.
- Choose Layer > Smart Objects > Convert to Smart Object.
- Choose Layer > Smart Objects > Stack Mode > Median.
Once that’s done, you can edit your photo if there glitches in the processing, but the whole process isn’t entirely too complicated.

No comments:
Post a Comment